A dedicated server comes off as the most reliable server in web hosting solutions. It gives you superb performance for your company website.
Your business needs dedicated hosting for consistent uptime and higher speed.

One of the best things about dedicated website hosting is that you can have remote access to it.
Remote access to your dedicated web server helps you get your data and applications from anywhere. This helps you manage your server with security and important remote work.
You can have remote access to your dedicated server hosting in so many ways. One is through your computer settings.
But you need to go through a secure login to keep your dedicated web server safe for remote access.
Here comes PuTTY, a free and open-source software that works as a terminal emulator.

PuTTY supports many different network protocols. So, this helps connect to your dedicated hosting in a very secure process.
This blog will explain how to log into your dedicated server using PuTTY with proper and useful steps.
This blog will guide you about:
Why You Need PuTTY for Dedicated Servers
Ways of Accessing Your Dedicated Server via PuTTY
Necessity of a Firewall for Your IP Address
So, let’s start!
What Is a Dedicated Server?
Before heading into the main discussion, it’s important to know a little bit about the essentials.
A dedicated server is a very popular type of web hosting service. You or your company gets an entire physical server in dedicated hosting. That means you also get all the resources of the server. With this, you also get sole access to all the server’s hardware. CPU, RAM, storage, and bandwidth consist of such essential hardware.

A dedicated web server comes with unique aspects. These special aspects make the servers different from other web hosting solutions. It gives you high performance and top-notch security. You can customize the server’s hardware and software settings. You can also configure your server to manage bigger workloads suiting your needs. You get to have full control over your server, too.
There’s also another important aspect of having a dedicated server hosting. You get the facilities of a dedicated IP address with it.
What Is a Dedicated IP Address?
A dedicated IP address performs as a static IP address. A dedicated server carries this IP address to run the website on the internet.
A dedicated web server belongs to a specific website. That website has a unique IP address that no one can share. So, a dedicated IP address holds the identity of your dedicated hosting.

This address eases the server management tasks for you. It gives you direct access to the server. It improves the performance of your website with a clear flow of network traffic. It is also essential for SSL certificates. These certificates secure data between your website and users.
What Is SSH?
SSH is a secure network protocol. It helps access and manage remote computers or dedicated servers. SSH means Secure Shell. It gives you a secure channel over an unsecured network.

It encrypts communication between the client and the server. Here, a local machine works as a client, and a remote machine as the server. So, you can remote login to a server through SSH.
What Is PuTTY?
PuTTY works as an open-source SSH client for Windows. It allows you to connect to remote dedicated servers with a secure process. You can manage remote systems like Linux and Unix servers through this software. It also supports other network protocols like Telnet, SCP, and SFTP.
But, in general, it helps to set up SSH connections. It gives you a secure channel for remote command-line access. This helps you to handle and configure your dedicated web server from anywhere.
Why Need PuTTY for Your Dedicated Server?
PuTTY is the best option to log into your dedicated server in the most secure process. These are some reasons why you need PuTTY:
- Using SSH: It uses SSH or Secure Shell to login to your dedicated web server. Using SSH makes remote access to the server very secure.
- Remote Execution: You can give commands on a remote server through PuTTY. PuTTY also works on servers supporting Unix or Linux. And you can do that from a Windows computer with ease.
- Easy File Transfer: You can use PuTTY as a file transfer protocol. This helps you access files and email saved on a remote server.
- Network Protocols: It supports different network protocols like Telnet, SCP, and rlogin, along with SSH.
- Secure Interface: It comes with a secure interface that provides safe data communication.
All these aspects are enough to assure you to trust logging into dedicated hosting through this. This makes it all easy to handle dedicated server hosting with a secure login.
How to Login to Your Dedicated Server with PuTTY in Easy Steps
These are the following steps to connect to your dedicated server with PuTTY.
Step 1: Download and install PuTTY.

Step 2: Open the application after installation. The configuration interface looks like this –

Step 3: On the right side, you will see the “Host Name” option. This option asks for the IP address of the dedicated web server you want to login.

Step 4: Below that, it gives you options for “Connection type”. Here, you get different network protocols from which to choose.

Since this blog talks about SSH, we are focusing on that only.
Step 5: Give the dedicated IP address in the “Host Name” option.

In the photo above, there is an IP address (108.181.6.234) given in the box.
Step 6: Then, click on the “Open” button.

Then, it will open a command line interface (CLI) window to have further commands. The first command it will ask is “login as:”
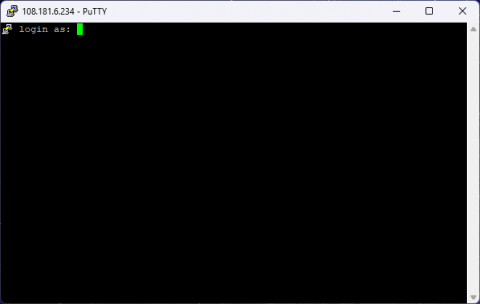

Step 7: So, your next step will be to provide the login username by typing. Or, you can also copy the login username. Then, right-click it on the green blinking cursor. Press enter, and it will take the username at once.
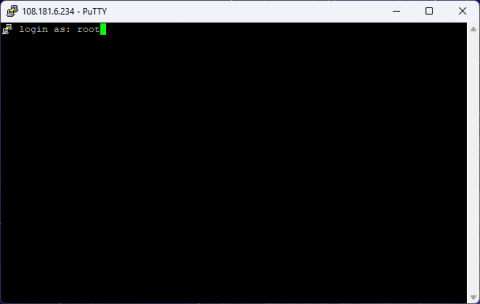

Here, there is a login username, root, given as the command.
Step 8: Then, it will ask for you to provide the login username’s password. The command will show its syntax like this:
loginusername@IP address’s password:
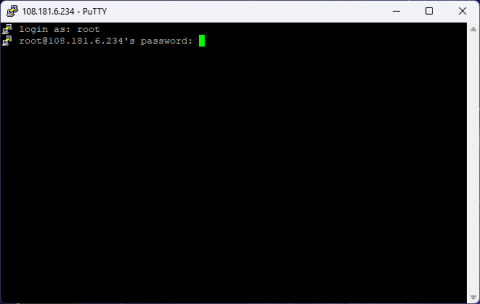

Here, it has taken root as the login username. And, after ‘@’, it has taken 108.181.6.234 as the IP address.
Step 9: You can type or copy the password in there with the same method. But it will type or paste the password invisible. It stays invisible to protect your password.
Then, it will give you access to the server with a last login history in short with day, date, time, and year. It will also provide the IP address that did the login.

Here, you can see the last login history in the "last login:" column.
Step 10: Then, it will ask for more commands. And all you have to do is to give apt commands to look into the server further.
These are the basic and most essential steps to connect to your dedicated server.
But there is also an extra step you need to follow in case of a security alert.
That security alert appears as “PuTTY Security Alert”.

It only appears when the software doubts about the nature of the server. It comes as a concern whether the server is related to a computer.
This alert asks you if you trust the host (or, the IP address). So, you have to click on the “accept” button.

This will make PuTTY start its further operations.
Do You Need to Add Your IP Address to the Firewall?
A firewall works as a security device in your computer. It checks on and controls incoming and outgoing network traffic. And it maintains that protocol by following some predefined security rules. It acts as a wall between a trusted internal network and untrusted external networks. This is how it blocks dangerous traffic and illegal access.
So, sometimes, your computer’s firewall might block access to your IP address.

This happens when it assumes your dedicated IP address as an untrusted external network.
So, that means the firewall has blacklisted the IP address you’re trying to use.
If this issue happens, only then you have to add your IP address to the firewall. This will make your login to the dedicated server possible with PuTTY.
Otherwise, you’re all good to go.
N.B. Firewall blocking the IP address has no relation with the PuTTY security alert.
Final Thoughts
Logging into your dedicated server from anywhere gets easy with PuTTY.
Also, the steps of logging into your dedicated web server with PuTTY are easy.
Connecting to your dedicated server hosting through PuTTY saves you a lot of time. You get to know the status, collect data, and access information about your server at once.
I hope this blog has given you a clear idea of how to make a secure login through SSH.
PuTTY offers you the best and easiest solution for remote accessing your dedicated hosting.


